I'm hanging this from a neighbor's can light - 6" outside diameter to be exact.
First, I put a couple of straightened 5" 'L' brackets inside the can light.
The entire webcam assembly is placed inside a 6" inner diameter
foot long sewer pipe (yes, sewer pipe!) which is then hung from a threaded
metal rod that goes through those brackets - two wingnuts hold it in place.
Inside of that, the webcam hangs from a 5" diameter plate that is suspended
by two more rods that are placed through the sewer pipe. An end cap sits at
the bottom where the webcam 120VAC-12VDC transformer is placed - this also
provides a little extra warmth for low temperature operation. I'll try
leaving the end cap vented (there's about a 1/4" opening on the top) so
there is some ventilation that should prevent fogging in the viewport ...
which is just a free plexiglass AOL CD case cover that is taped on! ;-)
Since this was going to be installed at a neighbor's house, it was
prudent to "test" things out at my house first as shown in the first set of
pictures below. You can optionally add a cheap wireless temperature sensor
inside the PVC and another taped to the outside which would provide a
"delta temperature" reading.
Actual installation was super-duper easy since the entire unit is
self-contained, with only a power cord coming out of the top. Plug that in,
run the threaded metal rod through the PVC-bracket-bracket-PVC, screw
down the wingnut, and you are ready for action!
Outdoor Webcam Enclosure Parts - $27.34
3 foot long threaded metal rods with wing nuts, 4 sheet metal screws, socket-to-plug adapter
6" Sewer pipe, end cap, 5" cap, two "L" brackets (free AOL CD case not shown)
Dlink DCS-6620G with threaded base and transformer also shown
|
 |
|
|
5" 'L' brackets straightened in a vise
Then internal cut extended with a hacksaw
Yea, not a very good job on that 2nd one! |
Sheet metal screws are used to anchor those brackets
The metal rod can then hang from there
Note socket to plug adapter in place |
 |
 |
|
|
Yep - that's really sewer pipe - no expense spared! |
First test hanging of the webcam enclosure
Basic concept will work - need to straighten up a bit!
My can lights were 6 1/2" diameter - neighbors are 6"
so brackets will be on the inside of the pipe there |
 |
 |
|
|
Put Can lights back togather - note cracked plaster
It didn't look like that before - yikes!
Try to cover up before wife gets home and notices |
Carpet below doesn't look too pretty either
Fire up vacuum before wife gets home! |
 |
 |
|
|
Needed to be able to "hang" the webcam
So run bolt through 5" diameter cover plate
Extra nuts are to reduce chance of stripping webcam threads |
Center rod hangs from the can light brackets
Two side rods are use to hang the 5" cover plate with webcam |
 |
 |
|
|
|
A view from the bottom |
 |
 |
|
|
Ready for installation w/AOL plexiglass CD cover
Extension cord is plugged in and the top middle rod hangs from brackets
Reflection is from sun at the right - should be non-issue at night
|
 |
|
|
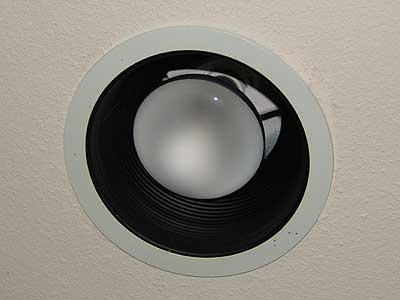
Outdoor webcam enclosure installed under the can light
|
 |
|
|
Inside of Webcam Enclosure
Webcam doesn't always center properly - easy enough to pan over
|
 |
|
|
Here's the "real" view
The Aspen Leaves obscuring the view should drop soon
|
 |
|
|
Webcam takes a picture of Alek taking a picture of the webcam
|
 |