Final Patio Design - large JPEG and PDF

Original 460' Deck Design

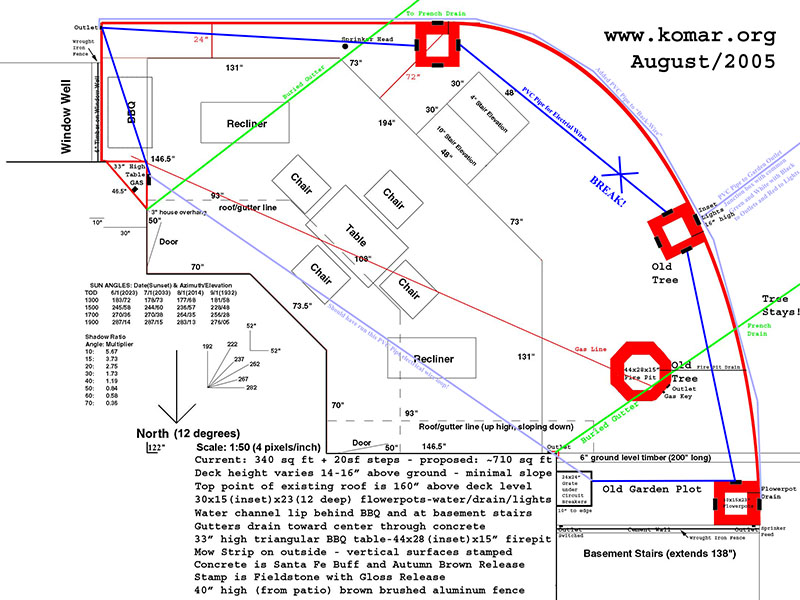
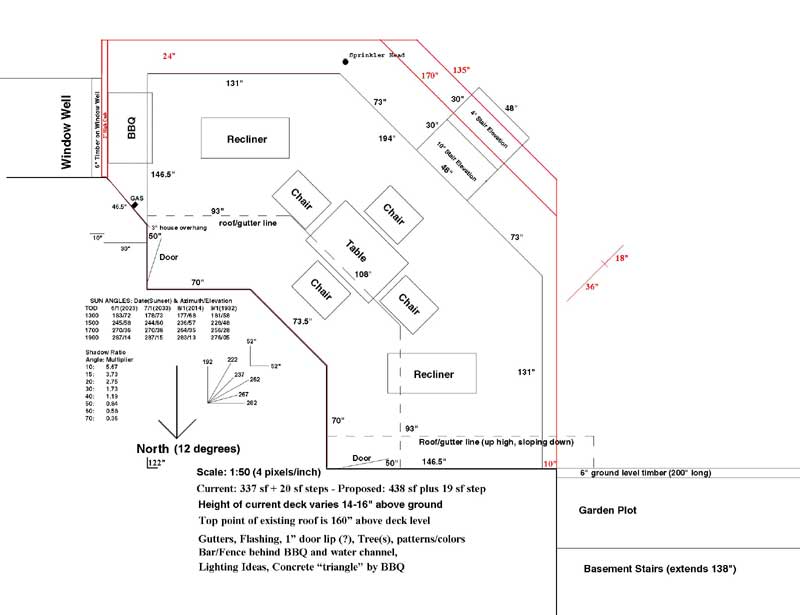
We debated doing Trex-type wood deck design, but this is comparable in cost to doing stamped concrete, and we really like the look of the later ... although it's permanent (!) ... so I spent quite a bit of time drawing up plans to try to figure out what we REALLY wanted. My original design was about 460 square feet, but then my neighbors were over one evening and convinced us that we should "go big or go home" ... so I increased it to 710 square feet and added three flowerpots and an outdoor fire pit as can be seen in the design below - the existing angular wood deck is outlined in black - the "new-n-improved" mongo deck is outlined in red.
I talked to several stamped concrete contractors and got varying opinions
about fibermesh concrete versus rebar to minimize and control cracking.
The last thing I want to have to do is bring out
a concrete cutter again as I did (willingly) when I finished my basement
crawlspace.
So I decided to go with both! Read more of my deck design notes
below the images of the patio plans.


Louvered lights set in the concrete of the flowerpots will provide some indirect light. I really wanted to put rope light along the length of the deck buried into an inset, but my wife wasn't too gung-ho about the idea - I get a little outa-control at halloween - christmas - but I was able to get this done. I added electrical outlets at the corners of the deck - makes it easier for me to power the rotisserie for the the barbeque grill - and also one by the fire pit.
I converted my grill from LP to NG a few years back, so I have a gas line at the deck and ran a pipe to a 44x28x15" fire-pit on the west side of the deck which is the main "open" area. This is great in the evenings and extends the season when you can be outside as it takes the "bite" off the evening chill.
Since there is irrigation in the "Garden Plot" area, I ran water to the flower pots - my wife likes the idea of not having to water the plants ... and the Garden Plot is perhaps mis-labeled since it's a weed-fest - won't even have to apply any weed killer to take this out. Ironically, getting rid of this area seems to be one of the things Wendy was most excited about expanding the patio design. The flowerpots are are square - 30" outside, 15" inset, 23" above deck level, and 12" deep for soil with drainage holes drilled. The deck lighting is 16" high and hopefully they will cast enough light.
The triangular BBQ table has turned out to be really cool. The original intent was that since this is a bit of dead space, I would have a spot to put stuff coming to/from the BBQ. Turns out (duhh!) it's a nice place to put stuff down to open the patio door. It is 33" high.
While we had 'em stamp the top of the flowerpots, firepit, and BBQ table, we may eventually top with some sort of flagstone ... or maybe even granite.
A poured concrete landscape edging (or "mow strip") is along the outside border. The idea behind this is everytime I mow the lawn, I have to follow up with the weed wacker because the lawnmower wheels abut against the existing wood deck. With the mow strip, the lawn mower blade can cut all the grass; less lawn work is good ... and this works great!
Safety fences are installed behind the BBQ (a bit redundant, but still a good idea in case the BBQ rolls) and next to the basement stairs. There were some cracking concerns about installing into the concrete patio itself, so it is bolted on just on the outside of that.
It was really hard to figure out what the "right" colors should be since the color samples sheets don't to 'em justice. But we decided on a Santa Fe Buff with Russett Release and a Gloss finish. The later makes it a bit more slippery, but provides that "wet look" that we like. "Shark's Teeth" were added to the glossy finish to add some friction - works well. BTW, the Stamp pattern in the stone is called Fieldstone.
The table of numbers in the deck plans above are the azimuth/elevation as a
function of date/time for my latitude/longitude where I live.
The "Shadow Angle/Ratio Multiplier" refers
to if the Sun is at a certain elevation, how much longer the shadow is - i.e.
at 30° elevation, it is 1.73 means a 6' person cast a shadow 10.38 feet.
Deck Wiring Status:
Before the concrete pour, PVC pipes were run for wires - the routing was from the power outlet (below the circuit breaker panel) to the 1st flowerpot, a "T" branch to the nearby power outlet, then to the 2nd flowerpot, then 3rd one, then to
the power outlet in the SE corner, and then to the table by the BBQ.
Unfortunately, one of the PVC pipes was jostled loose during the concrete pour, so it was not possible to run electrical wire between the second and third flower pot. This was a major bummer as we tried all sorts of stuff including drilling it out, but it probably side-slipped. Eventual solution was to "back-wire" it by running wires inside buried PVC pipe just outside of the concrete patio that connected the NW outlet with the SE one. Bad news is that it was about 70' of PVC pipe to bury (and the outlet now extends out) - good news is that it was in ground, not in concrete. This was a LOT of extra work, but again, this was the best we could do given the situation - tunneling under the concrete flower pots would NOT be a good idea. Since we were doing this, a junction box was placed next to the 2nd flowerpot that runs PVC to the SW flower garden where there is an outlet.
In hindsight, running an extra PVC pipe from the start to the finish (i.e. "completing the loop") would have been smart as that would have allow a MUCH easier "back-wiring" - see diagram at top of page.
In 2008, a GFI fault developed somewhere - probably related to something loose and/or grounding in the junction box outside the 2nd flowerpot. In order not to have the lights not work because of a tripped GFI, the dimmer bypassed this. This is OK per code since stuff isn't plugged in there.
In 2019, I got motivated to dig everything up ... since the outlets were not working but FYI there was phantom voltage there due to inductive pickup from the lighting wiring. The flowerpots wiring looking good, but I ended up re-wiring the junction box, cleaned it up by digging out some dirt ... and now everything works correctly ... at least for now! ;-)
Note that the Green (ground) and White wires are common - black wire is used
for the outlets - red for the lights.
©2005 www.komar.org - Alek Komarnitsky